Balance is a fundamental skill in daily activity necessary for the safe completion of any type of movement or activity pattern. Specifically, balance refers to the body’s ability to maintain its center of gravity over its base of support during a given action. It relies upon a feedback network from the vestibular, visual, and somatosensory systems for ideal and smooth motor function.
Introduction to Balance Training
Essentially, balance is the ability of the body to maintain its equilibrium.4 Proper balance not only aids in injury prevention but is vital for a variety of specific athletic movements.1
Individuals from many different populations benefit from incorporating balance training. Fitness professionals must have a working knowledge of balance training programming and exercises to safely and effectively implement balance training into fitness programs when appropriate. They must know basic balance concepts, how to progress movements, and the correct technique for exercises.
Balance Training Concepts
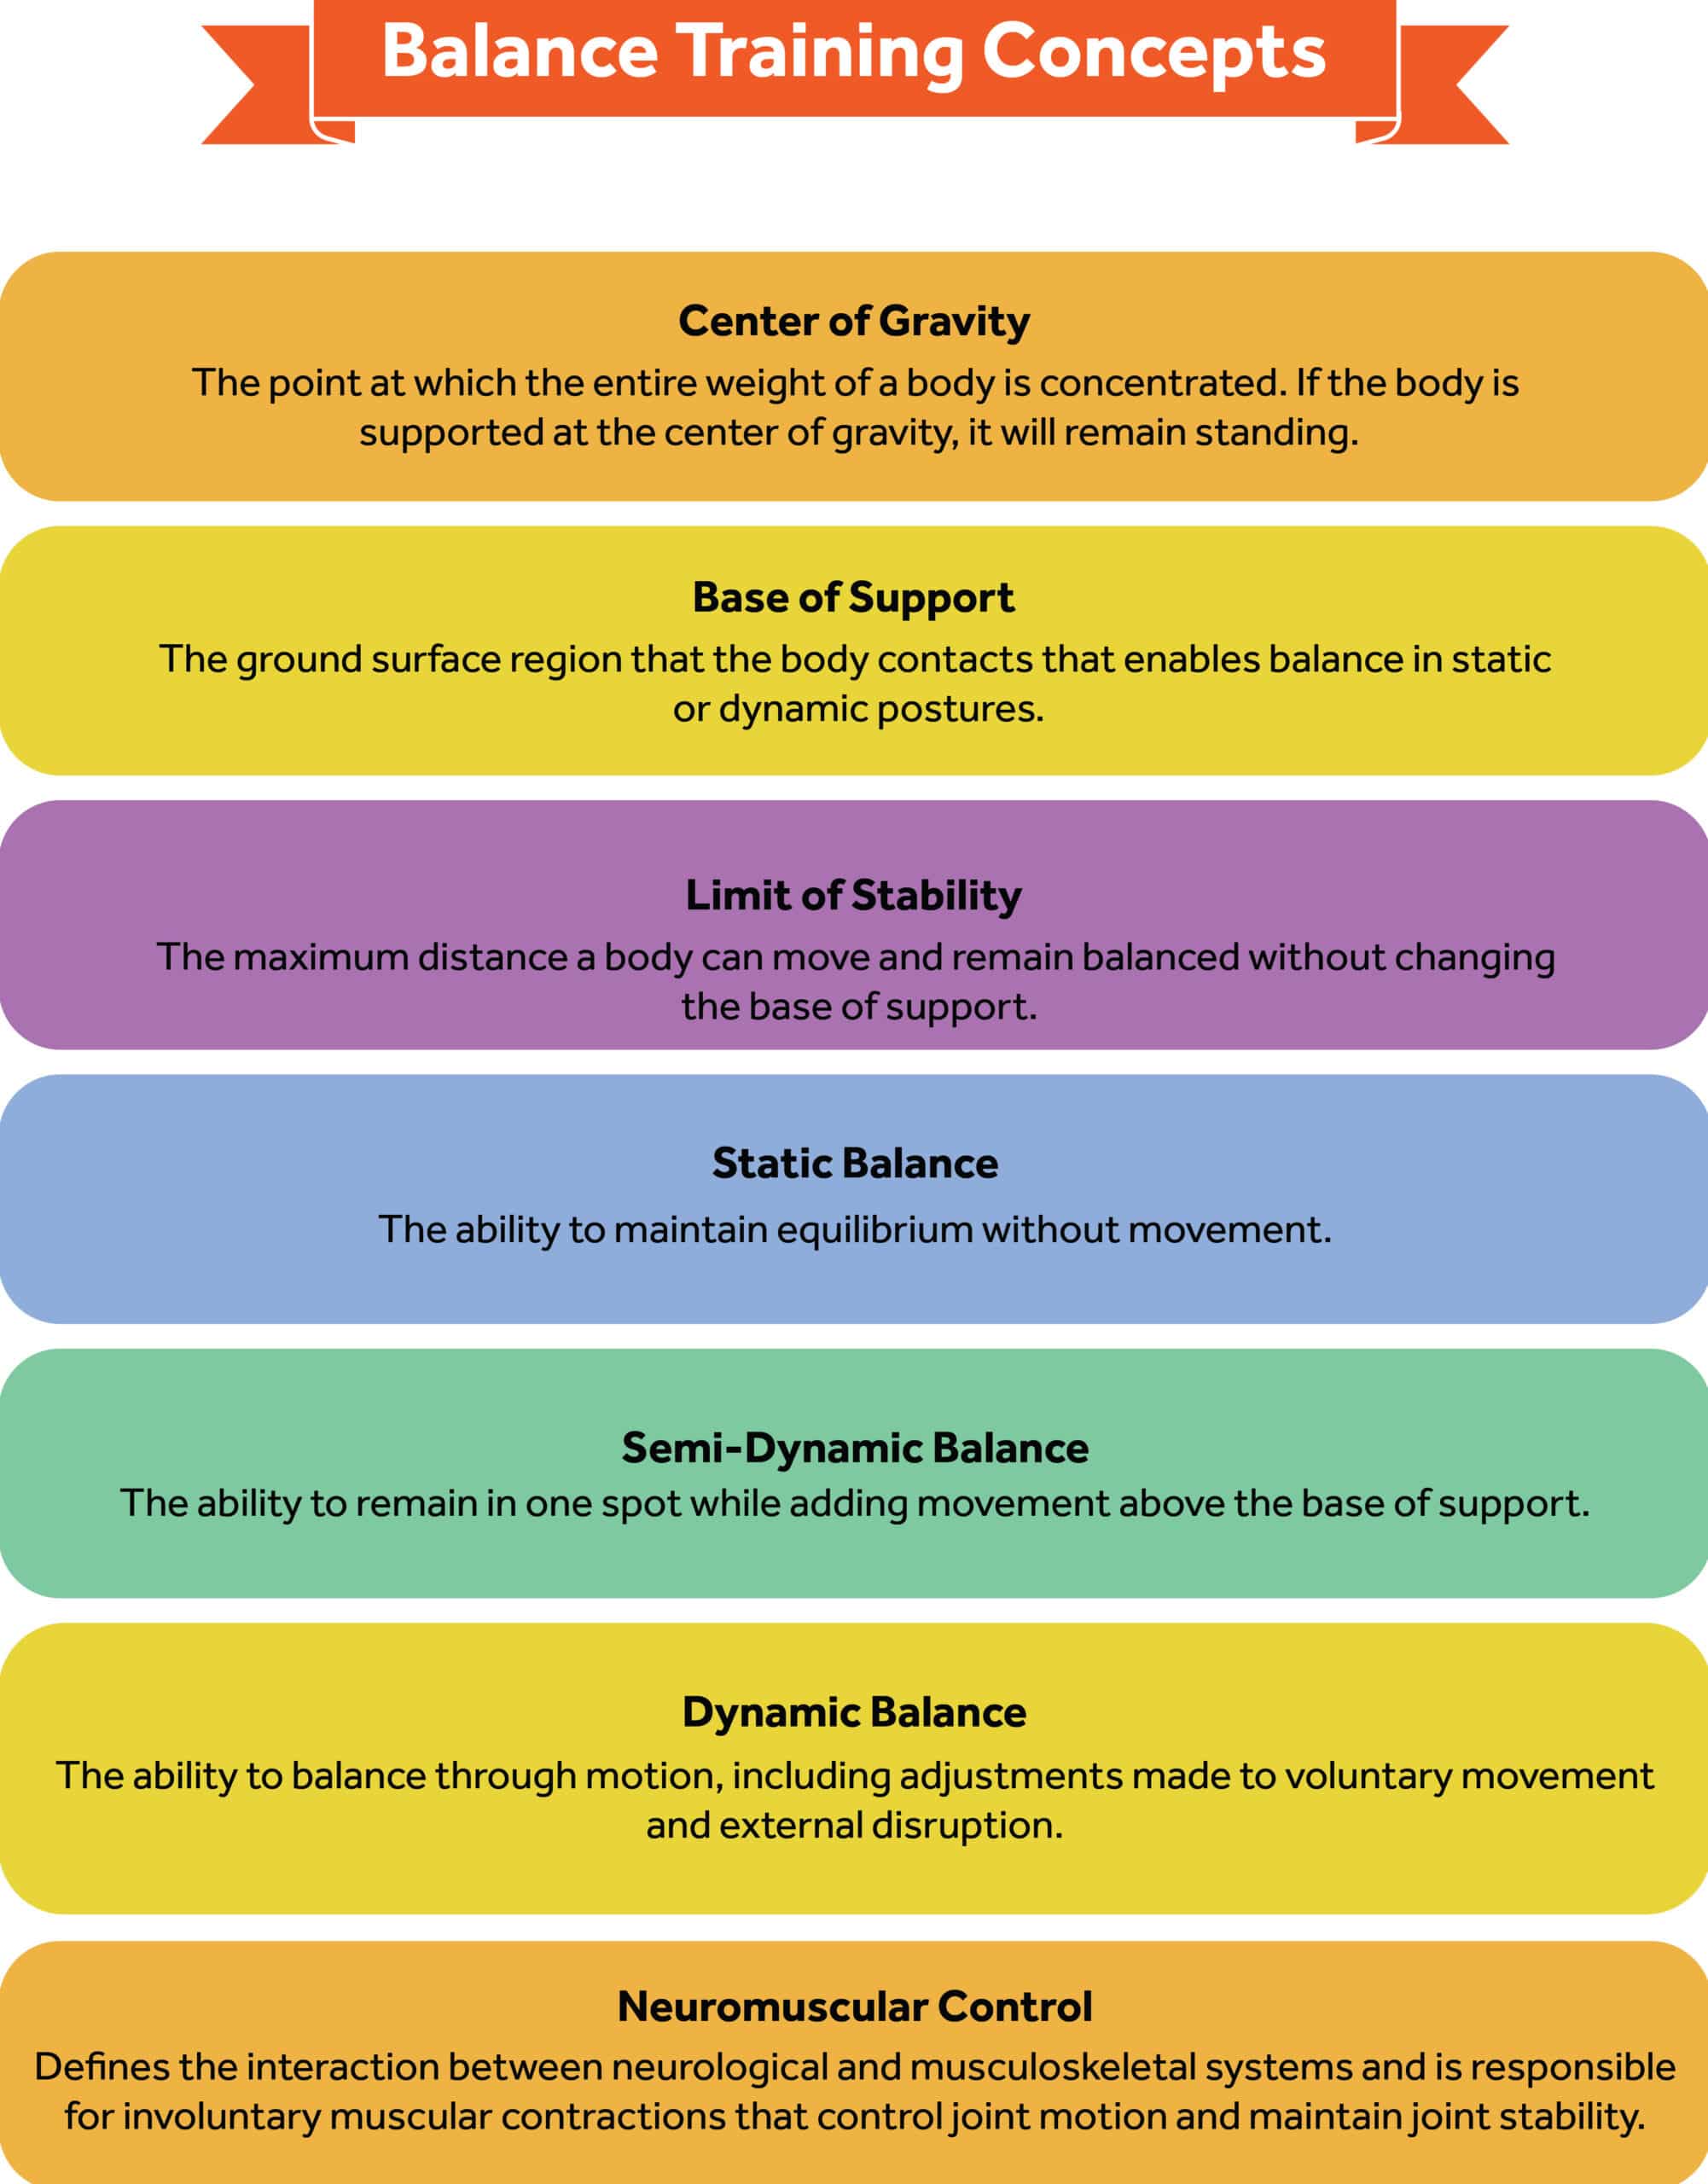
Center of Gravity
Center of gravity is refers to the point at which the entire weight of a body is concentrated so that, if supported at this point, the body remains in equilibrium in any position.2, 14
Base of Support
The base of support is the region of ground surface that the body contacts.3, 14
The center of mass operates perpendicular to the base of support, enabling the body to remain balanced through static or dynamic postures.3
Limit of Stability
The limit of stability is the maximum distance the body can move while remaining balanced before having to change the base of support.4
Static Balance
The body’s ability to maintain equilibrium without movement.4
Semi-Dynamic Balance
Semi-dynamic balance refers to the ability to stay in the same spot with the addition of movement.4
Dynamic Balance
Includes the ability to balance through motion including adjustments made to voluntary movement and to maintain balance during disruption from an outside influence.4
Vestibular System
The vestibular system resides in the inner ear and relates information relating to acceleration and guidance continuously, providing movement and positioning feedback.5
This system provides vital information for rapid compensatory movements in response to external or internal forces being applied to the body.
Somatosensory System
The somatosensory system is a network of neurons that provides direct input to the central nervous system via muscle and connective tissue receptors. It is largely responsible for aiding both proprioception and kinesthesia for sensorimotor feedback, including connecting sensations of touch, pain, pressure, movement, and temperature from the tissues to the brain.6, 7
Visual System
The role of the visual system in relation to balance is in the detection of movement. Motion detected by the retina can be utilized to determine whether the movement is occurring from the individual or the environment.8, 9
The combination of the vestibular, somatosensory, and visual systems creates the necessary components for a fully functioning system of balance, allowing the individual to operate optimally at rest or in motion.5, 6, 8
Sensorimotor Function
The sensorimotor system functions to maintain joint stability and equilibrium throughout static and gait postures. It utilizes the processing information acquired through sensory, motor, and central integration feedback.10
Neuromuscular Control
Neuromuscular control is used to define the interaction between the neurological and musculoskeletal systems. As relating to balance, neuromuscular control is responsible for involuntary muscular contractions to control joint motion and maintenance of joint stability.10
Balance is a necessity for function in everyday life. Accomplishing tasks that involve displacement in the body while staying upright will involuntarily rely upon the systems that contribute to overall balance ability.14
Only through continuous and rapid feedback from the vestibular, visual, and somatosensory systems will the body maintain its center of gravity in dynamic or postural positions.1
Benefits of Balance Training
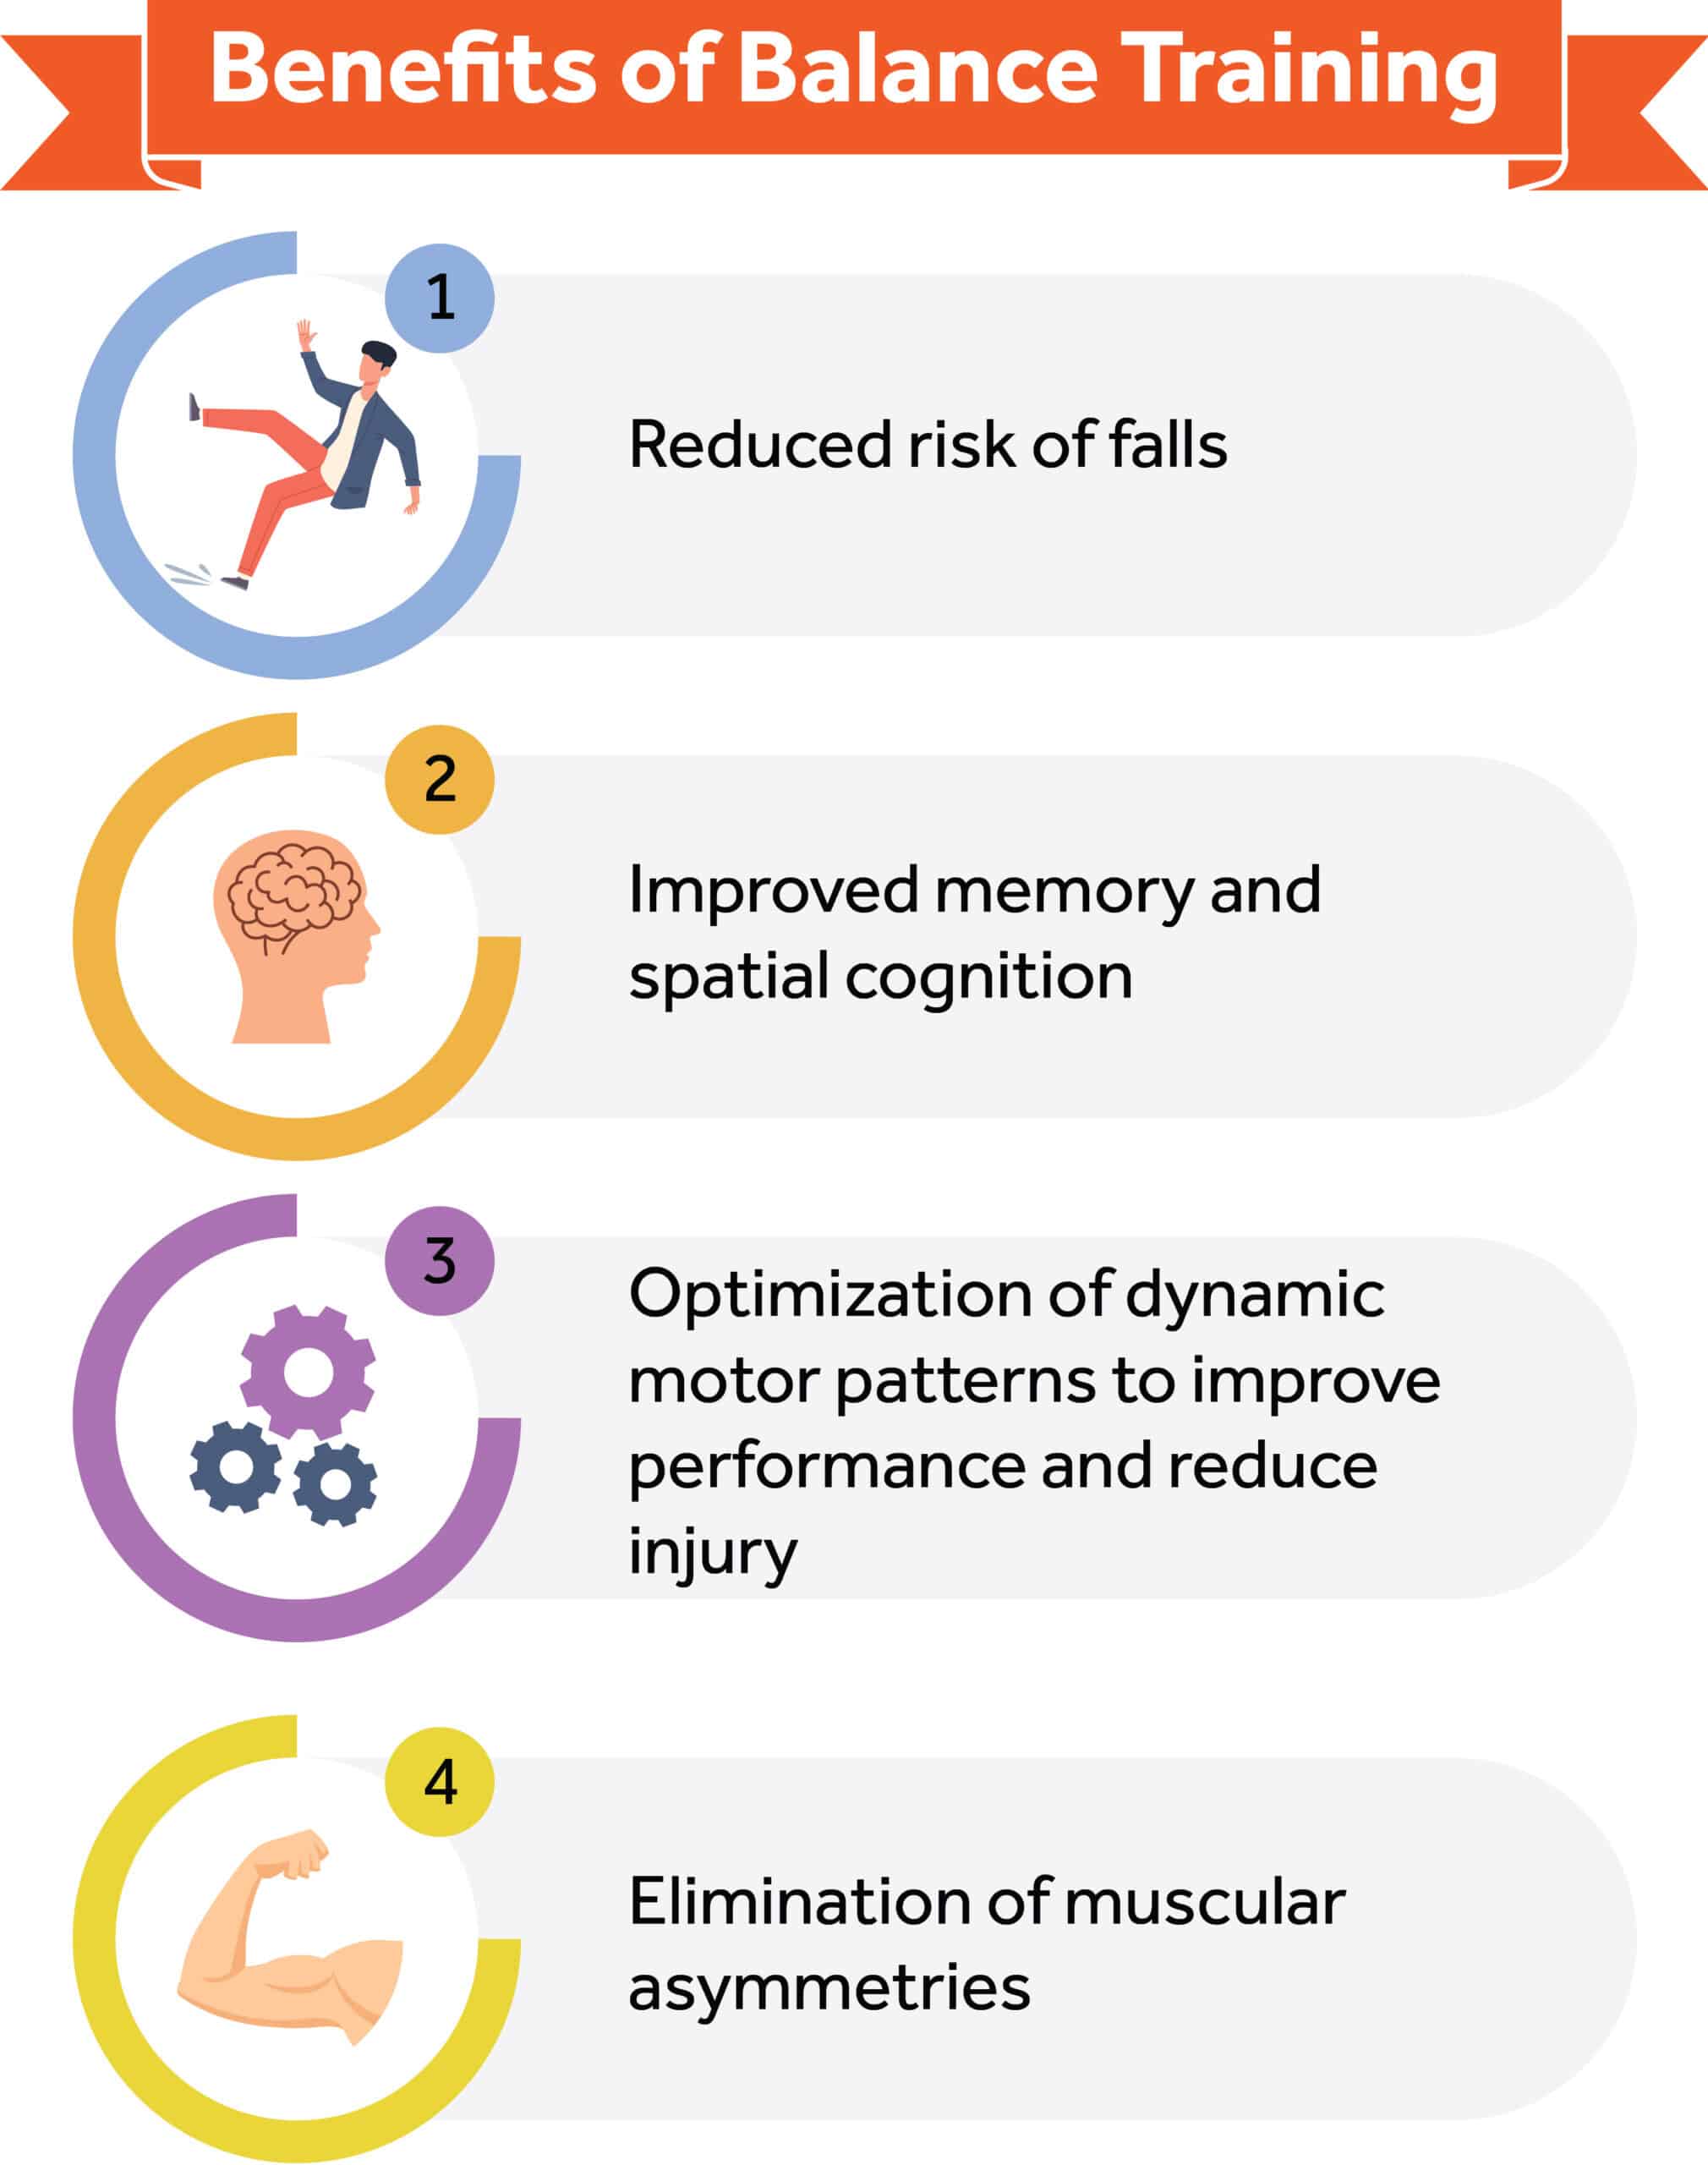
Effective balance training carries a multitude of positive impacts for regular and athletic bodies alike. Positive effects directly related to balance training include:
- Greatly reduced risk of bodily harm due to imbalance1
- Improved memory and spatial cognition11
- Optimization of dynamic motor patterns to improve performance and reduce injury 1,12
- Balance of muscular asymmetries13
Balance Training Progressions
Balance training requires a linear process that continually progresses from simple and safe exercises to more complex and unstable exercises as the body improves its sense of balance.15
Balance exercises occur in all three planes of motion.
Balance training seeks to introduce controlled instability as a client develops their sense of balance.15
From a movement plane perspective, exercises progress from sagittal, to frontal, and, finally, transverse.
Sagittal plane exercises have a high carryover to activities of daily life and thus have a high natural comfort level for users.
Frontal plane exercises introduce a combination of movements that will occur mostly in the frontal plane, but also have some interaction in the sagittal plane.
This added layer of complexity challenges the body and the balance by adding additional stress and dynamics with movement.16
Finally, the transverse plane utilizes a wide range of muscles with crossover to both the sagittal and frontal planes. The rotational nature of the exercises particularly challenges the visual balance system.
Creating exercise progressions uses a similar logical progression from comfortable and stable to challenging and unstable.
Here’s an example:
Lower-Body Progression:
Two-Legged Stance:
- Begin with a two-legged stance with feet shoulder width apart on a firm stable surface.
- Move to narrow the stance, still on two feet and a stable surface.
- Finally, progress to a staggered stance or heel-to-toe.
The initial positioning of the two-legged stance creates a wide base of support, making it easy for the user to maintain the center of gravity. With the first progression the base of support is narrowed reducing the area available to balance the center of gravity.
The progression to heel-to-toe maximally reduces the width of the base of support and will likely accompany postural sway as the user works to maintain their center of gravity.
After successfully completing heel-to-toe exercises, the next progression in balance training is to move to single-leg stance exercises.
One-Legged Stance, or Unstable Surface:
- Begin with a single-leg stance on a solid surface.
- Move to a two-legged stance on an unstable surface or balance modality.
- Finally, progress to a single-leg stance on an unstable surface or balance modality.
The first progression to a single-leg stance greatly reduces the overall surface area of the base of support and reduces the number of points of contact with the ground. Reducing contact points also decreases the number of pressure and touch sensors communicating with the central nervous system.
Following a single-leg stance, the next progression brings users back to a two-legged stance but on an unstable surface. Having a floor or modality that is constantly changing challenges the user’s perception of where they are in space, directly engaging the somatosensory system as proprioceptive feedback will rapidly change as the surface shifts. The next progression to single-leg stance again reduces the overall area of the base of support.
External Force:
Up to this point all balance progressions utilized only the internal force of the user’s own body. After passing single-leg and unstable surface exercises, the next progression incorporates an outside force upon the user.
- Push or pull in one direction or movement plane.
- Push or pull in multiple directions or movement planes.
The addition of external forces accompanying the movement challenges the vestibular system and its ability to counteract force to maintain a center of gravity.
The outside force starts small, for example catching a tennis ball.
Then, the intensity progresses via increased weight, such as using a medicine ball. Additionally, incorporating additional planes of movement as balancing skills increase will train the entire balance system.
Additional Variables:
Beyond adjusting foot positioning and the stability of the surface the user is balancing on, a few more progressions exist to challenge the ability to balance.
- Closing eyes during exercise. Eliminating the visual system puts greater emphasis on the rest of the balance system as a full layer of sensory feedback is removed.
- Additional cognitive tasks. Performing small mental tasks such as basic math while attempting to balance further challenges the brain’s capacity to sort through incoming sensory feedback.
Technique for Selected Balance Training Exercises:
Tandem Stance
Difficulty: low
Exercise Instructions:
- Start standing next to a wall or chair for safety.
- Line feet up, heel-to-toe, in a standing stance.
- Ensure toes of both feet are pointing straight ahead.
- Hold position for the desired time then switch feet.
- If needed, place a chair they may hold on to on either side in the event of loss of balance.
Single-Leg Balance
Difficulty: low
Exercise Instructions:
- Start standing in a comfortable neutral position. Hands can be on hips or floating.
- Flex one hip pulling foot off the floor and thigh to 90 degrees of hip flexion. Shoulders and hips should remain neutral.
- Hold for desired time. Ranges typically vary between 5-30 seconds.
- Repeat on the opposite side.
Balance can be aided in this position by maintaining full extension of the standing leg.
Single-Leg Balance Reach
Difficulty: low
Exercise Instructions:
- Start standing in a neutral position with feet hip width apart. Hands can be on hips or floating.
- Lift one leg while keeping the leg straight and float it directly in front of the body a few inches off the ground while ‘reaching’ forward with the foot. Maintain all weight on the stance leg. Do not step down with the reaching foot
- The exercise can be progressed by abducting the floating leg or opening the leg up into external rotation.
- Repeat on the opposite side.
Single-Leg Hip Rotation
Difficulty: low
Exercise Instructions:
- Start standing in a comfortable neutral position. Hands can be on hips or floating.
- Flex one hip, pulling the foot off the floor and thigh to 90 degrees of hip flexion. Shoulders and hips should remain neutral.
- Externally and internally rotate elevated leg at a controlled pace, holding briefly at the end range of motion.
- Repeat on the opposite side.
Single-Leg Lift and Chop
Difficulty: low
Exercise Instructions:
- Start standing in a neutral position while holding a medicine ball to one hip.
- Lift the opposite leg so that the body balances on a single leg with the medicine ball to that side.
- Hips should stay neutral while holding the floating leg is off the ground.
- Cross the medicine ball from hip of planted leg to the opposite shoulder in a diagonal pattern with straight arms.
- Return to the start position and repeat.
- Repeat on the opposite side.
Single-Leg Arm and Leg Motion
Difficulty: low
Exercise Instructions:
- Start standing in a neutral position.
- Lift one leg off the floor into a single leg balance position with shoulders and hips staying neutral.
- Lean forward while simultaneously reaching the floating leg behind them to full extension and opposite arm (arm of the planted leg) forward to full extension.
- Adjust the range of motion based on the user’s capability level.
- Continue performing the pattern for time.
- Repeat on the opposite side.
Single-Leg Windmill
Difficulty: low
Exercise Instructions:
- Start standing in a neutral position.
- Lift one leg off the floor into a single leg balance position with shoulders and hips staying neutral.
- Lean torso forward to 45 degrees while pushing hips back loading weight into the gluteus muscles.
- Extend both arms directly out to the sides.
- While maintaining balance, rotate arms and torso slowly as far as possible in each direction.
- Continue performing the pattern for time.
- Repeat on the opposite side.
Single-Leg Throw and Catch
Difficulty: low
Exercise Instructions:
- Start standing in a neutral position while holding a medicine ball with both hands.
- Lift one leg off the floor into a single leg balance position with shoulders and hips staying neutral.
- Toss the ball to a partner or trainer then catch the return toss while maintaining balance and alignment.
- Repeat for time or repetitions.
- Repeat on the opposite side.
- To progress the exercise, increase the distance, velocity, or placement of the throws.
Single-Leg Squat
Difficulty: low
Exercise Instructions:
- Start standing in a neutral position.
- Lift one leg off the floor into a single leg balance position with shoulders and hips staying neutral.
- Squat down on the planted leg as if sitting into a chair.
- Make sure knee stays in line with toes to avoid knee stress or injury.
- Hold briefly at the bottom of the squat.
- Fully extend the planted leg extending through the gluteal muscles to return to standing.
- Repeat for time or repetitions.
- Repeat on the opposite side.
Single-Leg Squat Touchdown
Difficulty: low
Exercise Instructions:
- Start standing in a neutral position.
- Lift one leg off the floor into a single leg balance position with shoulders and hips staying neutral.
- Squat down on the planted leg as if sitting in a chair.
- Make sure the knee stays in line with the toes to avoid knee stress or injury.
- At the bottom of the squat, reach the opposite hand to touch the toes of the planted foot.
- Fully extend the planted leg extending through the gluteal muscles to return to standing.
- Repeat for time or repetitions.
- Repeat on the opposite side.
- If unable to reach the toes, adjust the target to the leg or knee and work back down to the toes over time.
Single-Leg Romanian Deadlift
Difficulty: low
Exercise Instructions:
- Start standing in a neutral position.
- Lift one leg off the floor into a single leg balance position with shoulders and hips staying neutral.
- Keep the floating foot off the ground a few inches but next to the planted leg.
- Hinge forward at the hip of the planted leg, the torso should lean forward while the tailbone drives backward.
- Planted leg should remain extended with a minimal amount of knee bend.
- Reach for the planted foot with the opposite hand trying to touch the toes of the planted foot.
- Using the gluteal and abdominal muscles, extend the planted hip to return to an upright position.
- Repeat for time or repetitions.
- Repeat on the opposite side.
Multiplanar Step-Up to Balance
Difficulty: low
Exercise Instructions:
- Start standing in a neutral position directly in front of a stable elevated surface like a box, platform, or step.
- For the sagittal plane, lift one leg and place foot directly on top of the elevated surface.
- Toes and knee of forward foot should be aligned.
- Shift weight towards the forward foot pushing through the heel and extend the forward leg through the gluteal muscles and quadriceps to bring the body upright on top of the elevated surface.
- Hold top position for balance with opposite leg flexed in front of body to 90 degrees at both the hip and knee.
- Return lifted leg to the ground followed by the standing leg.
- Repeat for time or repetitions.
Progressions include:
- Alternating legs every repetition.
- Incorporate the frontal plane by performing a lateral step-up sideways to the elevated surface. The lateral step-up focus will be on stacking the hips, knees, and ankles in one vertical column during the movement.
- Incorporate the transverse plane by performing a rotational step-up from the side of the elevated surface while rotating to face the surface while placing the stepping foot. The opening step to place foot on the elevated surface will involve rotating the body to mirror the traditional step-up. Between the opening and closing rotation from/to start position, the checkpoints will be the same as the regular step-up.
Multiplanar Lunge to Balance
Difficulty: low
Exercise Instructions:
- Start standing in a neutral position.
- For the sagittal plane, lift one foot off the ground and step forward into a lunge with knees and toes pointing forward.
- Forward foot should be flat on the ground with forward knee directly above the ankle.
- Back foot will be pivoted onto toes and shoulders should be above the back knee.
- Both knees should bend to 90 degrees.
- Drive through the forward foot to extend the forward leg and push the weight back to the back leg.
- Come into a standing position on the back leg with the forward leg held in a balance position at 90 degrees of hip and knee flexion.
- Repeat for time or repetitions.
Progressions include:
- Incorporate the frontal plane by performing a lateral lunge to balance. The initial step will be to the side and focus on the forward leg will be on stacking the hips, knees, and ankles in one vertical column.
- Incorporate the transverse plane by performing a rotational lunge. The initial step will rotate the hips externally, so the user’s forward foot moves laterally and posteriorly to the back foot.
Multiplanar Hop with Stabilization
Difficulty: low
Exercise Instructions:
- Start standing in a neutral position.
- Lift one leg into a single leg balance stance.
- To perform in the sagittal plane, hop forward off the balancing leg and land on the opposite leg in a single leg balance position.
- Hold the balance position for 3-5 seconds.
- Hop backwards returning to the start position and landing in single leg balance on the original leg.
- Hold the balance position for 3-5 seconds.
- Repeat for time or repetitions.
Progressions include:
- Incorporate the frontal plane by performing a lateral hop to balance. The start position is identical, but the hop goes laterally instead of front to back.
- Incorporate the transverse plane by performing a rotational hop to balance. The start position is identical, but with external rotation of the balancing leg. The initial hop will go laterally and posteriorly to the side of the elevated leg. The second hop will still return to the start position.
Multiplanar Single-Leg Box Hop-Up with Stabilization
Difficulty: low
Exercise Instructions:
- Start standing in a neutral position directly in front of a stable elevated surface like a box, platform, or step.
- Lift one leg into a single leg balance stance.
- To perform in the sagittal plane, hop forward off the balancing leg and land on the same leg, on top of the surface, and in a single leg balance position.
- Hold the balance position for 3-5 seconds.
- Step backwards to return to the start position.
- Repeat for time or repetitions.
Progressions include:
- Hoping off the box as ability level allows.
- Incorporate the frontal plane by performing a lateral hop-up by stepping sideways to the elevated surface with the balancing leg closest to the surface. The hop onto the elevated surface will be lateral.
- Incorporate the transverse plane by performing a rotational hop-up by starting at the side of the elevated surface. The hop onto the elevated surface will incorporate rotating the body to land in a position that mirrors the sagittal plane hop-up. Between the opening and closing rotation from/to start position, the checkpoints will be the same as the sagittal hop-up.
Multiplanar Single-Leg Box Hop-Down with Stabilization
Difficulty: low
Exercise Instructions:
- Start standing in a neutral position on top of a stable elevated surface like a box, platform, or step.
- Lift one leg into a single leg balance stance.
- To perform in the sagittal plane, hop forward off the balancing leg and land on the same leg, on the floor, and in a single leg balance position.
- Hold the balance position for 3-5 seconds.
- Return to the start position.
- Repeat for time or repetitions.
Progressions include:
- Incorporate the frontal plane by performing a lateral hop-down by hopping laterally instead of anteriorly.
- Incorporate the transverse plane by performing a rotational hop-up by hoppng with an external rotation instead of moving anteriorly. The landing position should be a 90 degree turn from the start position.
Summary
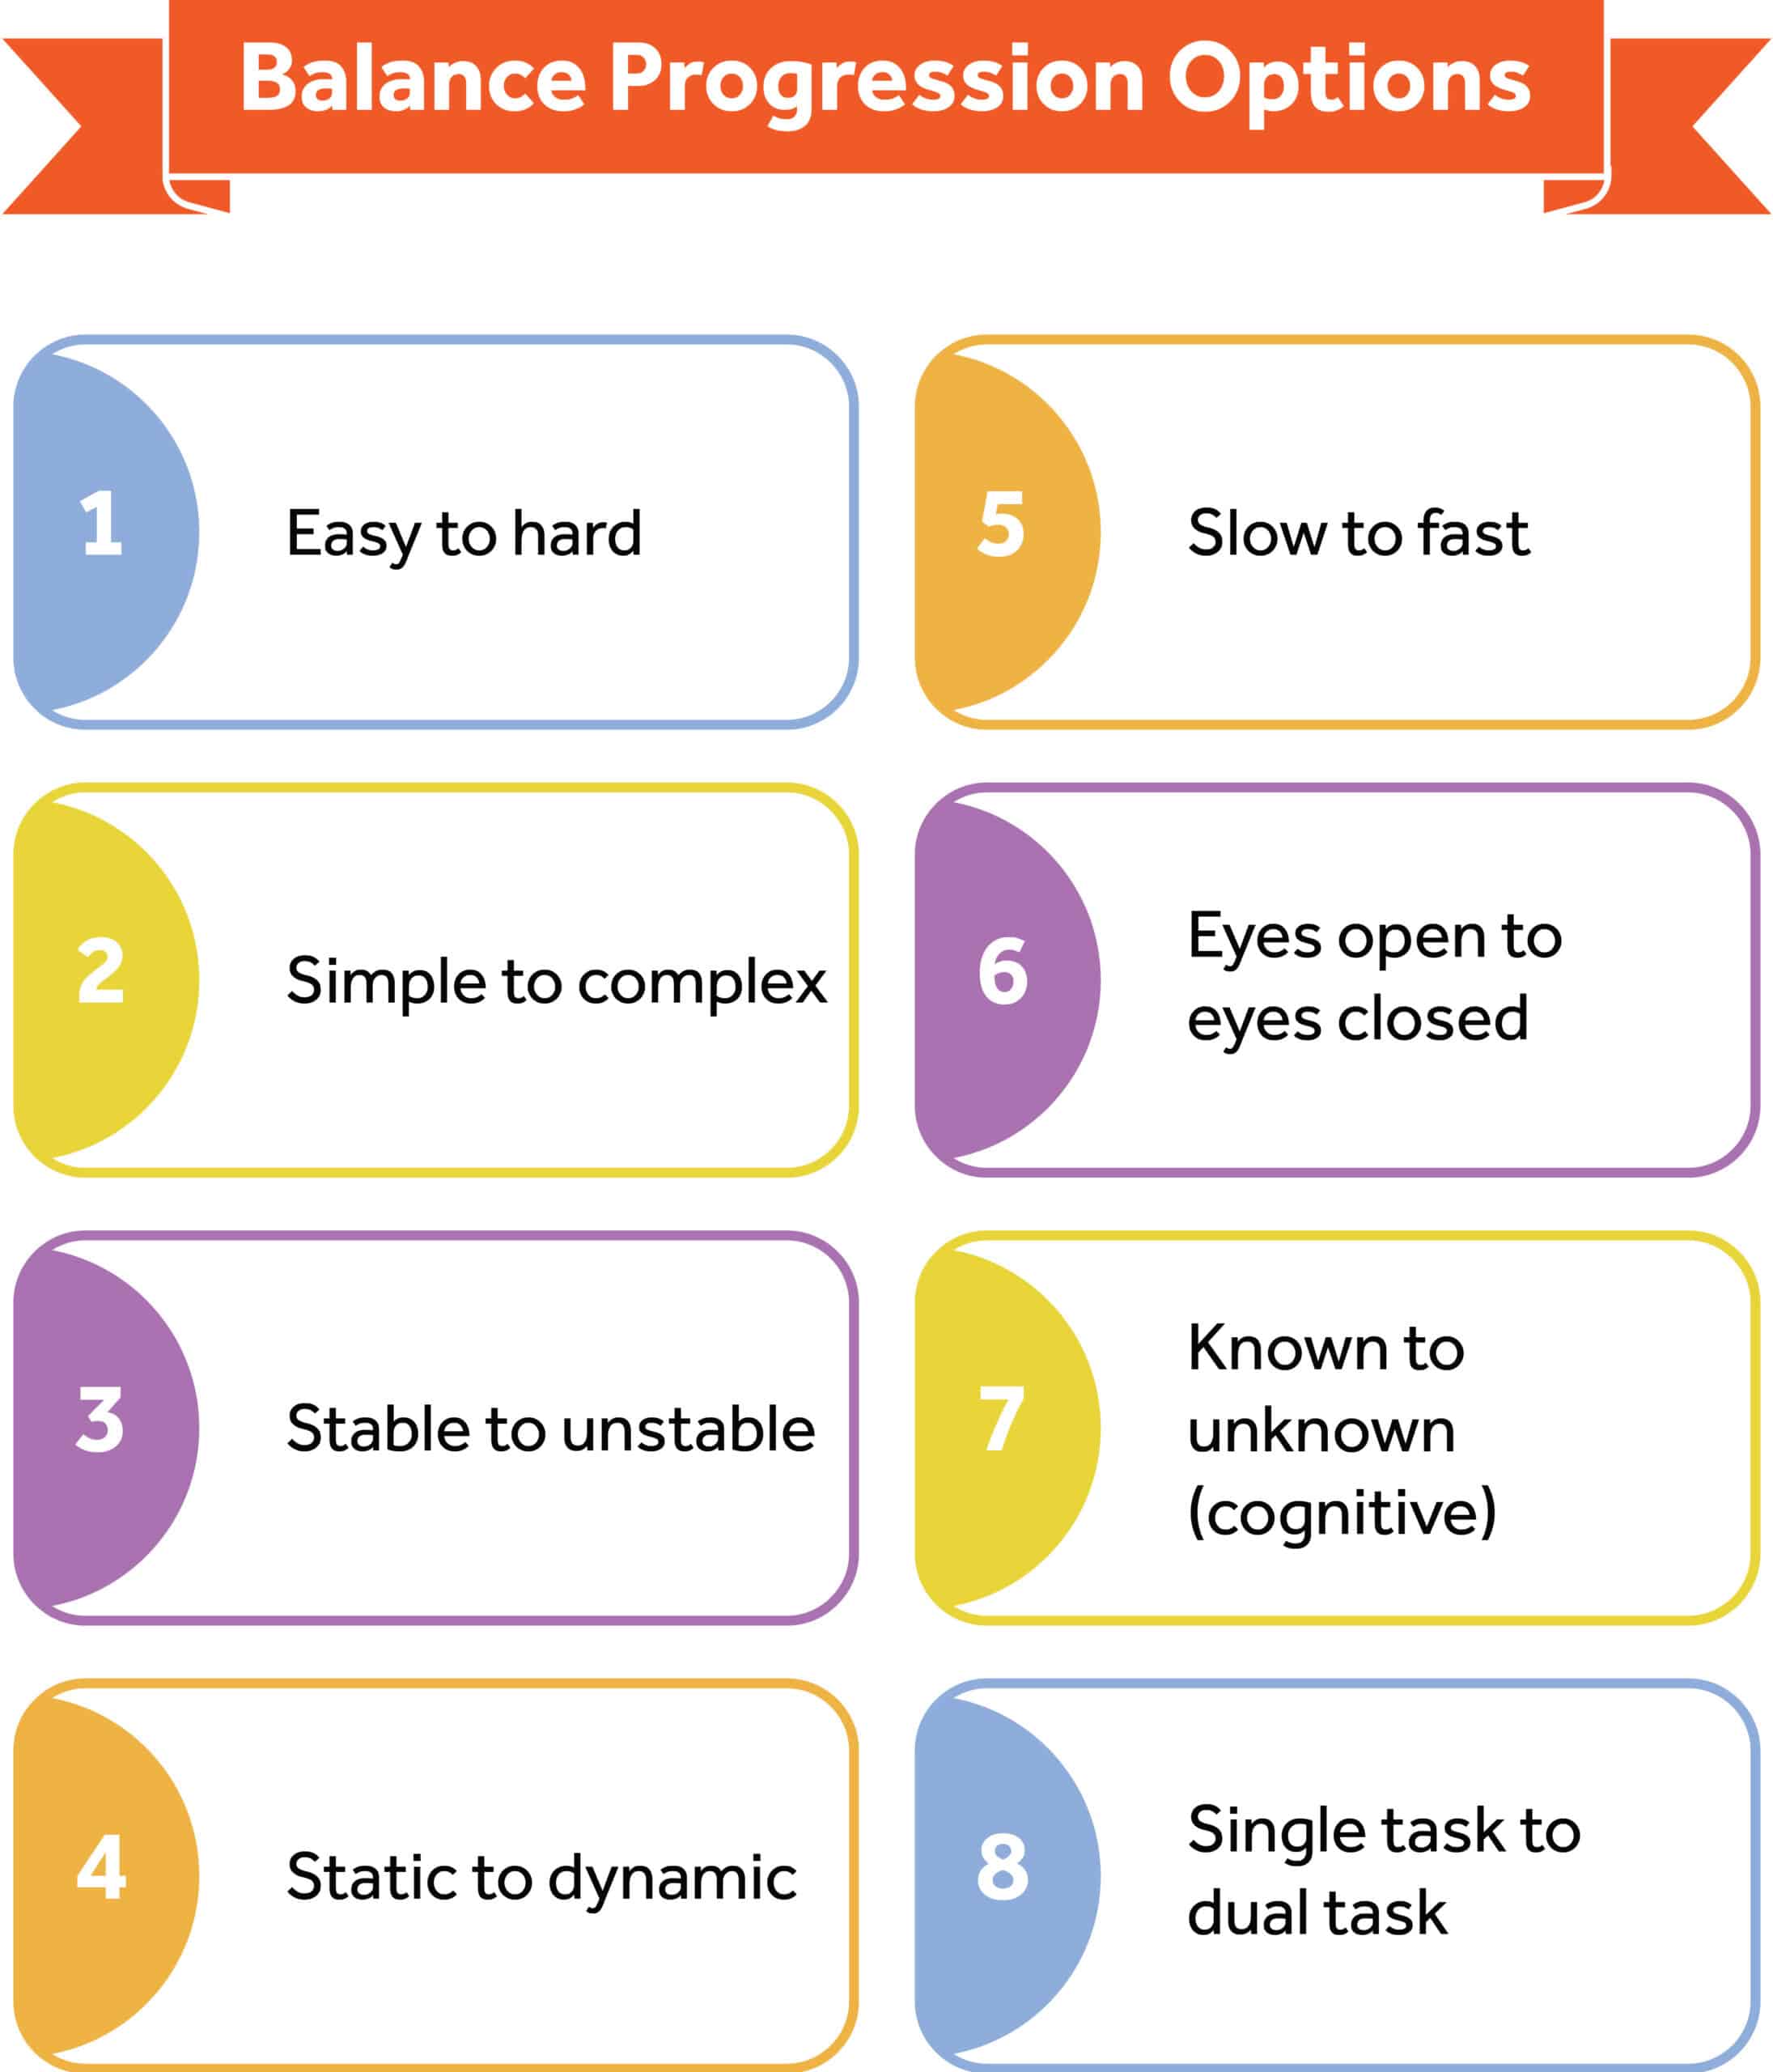
Balance training progressions should systematically challenge the neuromuscular system to produce effective improvements. The overall safety of the user or client is a priority as their ability to balance improves, so as not to overwhelm the balance system creating vulnerability to injury. Progression should follow the format of:
- Easy to hard
- Simple to complex
- Stable to unstable
- Static to dynamic
- Slow to fast
- Eyes open to eyes closed
- Known to unknown (cognitive task)
- Single task to dual-task
Some commonly used pieces of balance equipment that are highly effective at challenging the neuromuscular system include:
- Floor: utilizing a soft floor surface creates a minimal amount of instability forcing greater recruitment of balance training systems.
- Balance beam: a narrow-elevated surface that reduces the base of support available to the user.
- Half-foam roll: a semi-cylinder where the user stands on the curved surface. The flat surface is stable to avoid movement but standing on the arc of the roller greatly reduces points of contact and the base of support for the balancer.
- Foam pad: dense pad typically between 1-3 inches thick that dramatically reduces the stiffness of the standing surface. User can be pushed into any direction due to the give of the foam pad.
- Balance disc: small disc filled with air that provides greater give than the foam pad. Users can experience rapid changes in balance or direction.
- Wobble board: solid board with an attached curvy surface. Typically, user stands on the flat surface with the curved surface in contact with the solid floor. The combination of materials makes for rapid changes in direction if weight compensations occur from the user.
References
- Brachman, A; Kamieniarz, A; Michalska, J; Pawłowski, M; Słomka, K; Juras, G. Balance Training Programs in Athletes – A Systematic Review. Journal of Human Kinetics, 2017;58(1):45-64.
- “Center of gravity.” Merriam-Webster.com Dictionary, Merriam-Webster, https://www.merriam-webster.com/dictionary/center%20of%20gravity.
- Nam, HS; Kim, JH; Lim, YJ. The Effect of the Base of Support on Anticipatory Postural Adjustment and Postural Stability. Journal of Korean Physical Therapy, 2017;29(3):135-141.
- Ragnarsdottir, M. The Concept of Balance. Physiotherapy, 1996;82:368-375.
- Purves, D; Augustine, GJ; Fitzpatrick, D; et al. Neuroscience. 2nd edition. Sunderland (MA): Sinauer Associates; 2001. Chapter 14, The Vestibular System.
- Ogard, W. Proprioception in Sports Medicine and Athletic Conditioning. Strength and Conditioning Journal, 2011;33(3):111-118.
- Hillier, S: Immink, M; Thewlis, D; Assessing Proprioception: A Systematic Review of Possibilities. Neurorehabilitation and Neural Repair. 2015;29(10):933-949.
- Redfern, M; Yardley, L; Bronstein, A. Visual Influences on Balance. Journal of Anxiety Disorders. 2001;15(1-2):81-94.
- Hammami, R; Behm, D; Chtara, M; Othman, A; Chaouachi, A. Comparison of Static Balance and the Role of Vision in Elite Athletes. Journal of Human Kinetics. 2014;40:33-41.
- Riemann, B; Lephart, S. The Sensorimotor System, part I: the Physiologic Basis of Functional Joint Stability.The Journal of Athletic Training. 2002;37(1):71-9.
- Rogge, A; Röder, B; Zech, A; et al. Balance Training Improves Memory and Spatial Cognition in Healthy Adults. Scientific Reports. 2017;7:5661
- McGuine, T; Keene, J. The Effect of a Balance Training Program on the Risk of Ankle Sprains in High School Athletes. The American Journal of Sports Medicine. 2006;34(7):1103-1111.
- Sannicandro, I; Cofano, G; Rosa, RA; Piccinno, A. Balance Training Exercises Decrease Lower-limb Strength Asymmetry in Young Tennis Players. Journal of Sports Science Medicine. 2014, May 1;13(2):397-402.
- Yaggie, J; Campbell, B. Effects of Balance Training on Selected Skills. Journal of Strength Conditioning Research. 2006;20(2):422-428.
- Page, P. Sensorimotor Training: A “Global” Approach for Balance Training. Journal of Bodywork and Movement Therapies. 2006;10(1):77-84.
- Cuğ, M; Duncan, A; Wikstrom, E. Comparative Effects of Different Balance-Training-Progression Styles on Postural Control and Ankle Force Production: A Randomized Controlled Trial. Journal of Athletic Training. 2016;51(2):101-10.